
Input Systemでボタン割り当てをスクリプトから変更したり、マウス感度を調整したりする方法はないの?
可能だわ。Input Actionにはこのような機能がサポートされているわ。
Input SystemのActionをスクリプトから動的に構築したり変更する方法の解説記事です。
これを実践すると、次のようなことが実現できるようになります。
- キーアサインを変更する
- マウス感度などの調整機能の実装
- キーコンフィグ機能(リバインド)の実装
Input Systemでキャラクターの移動やジャンプ操作などを扱う時は、これらをActionという単位で管理します。この Actionを動的に作成したり変更したり削除したりできます。

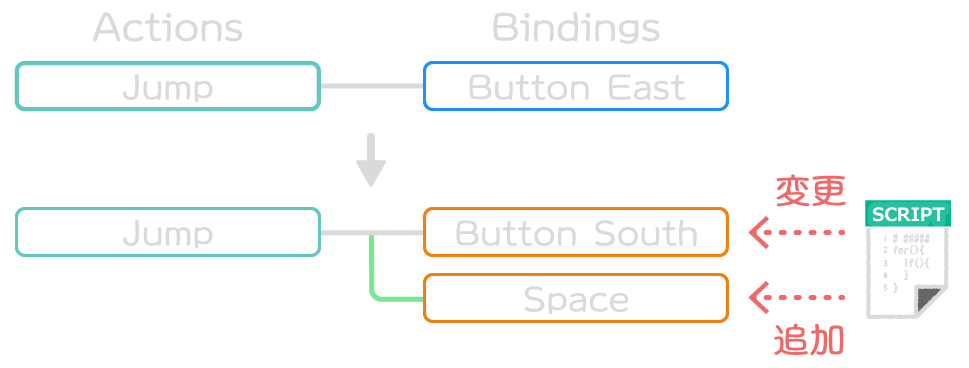
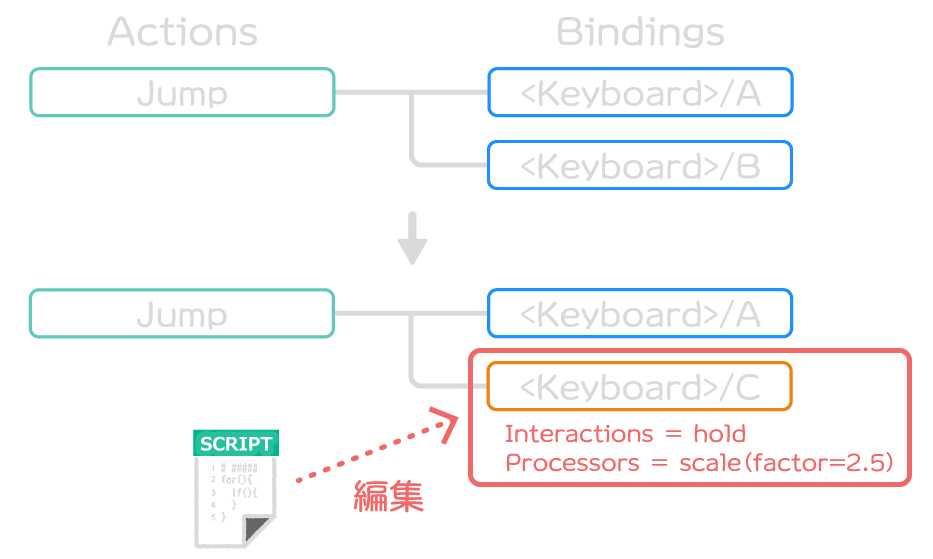
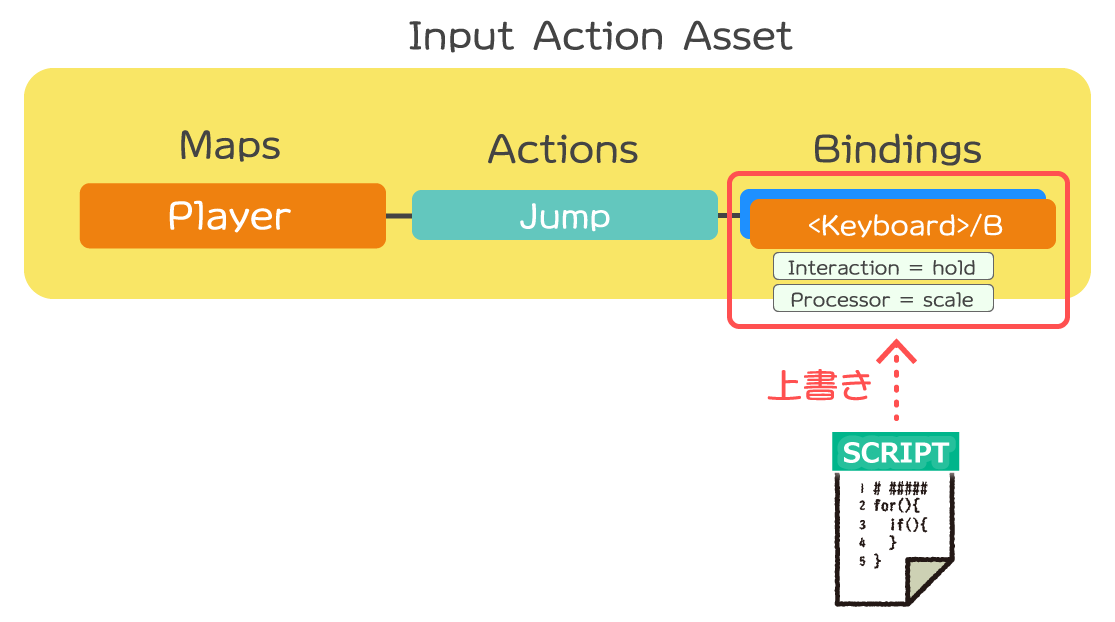
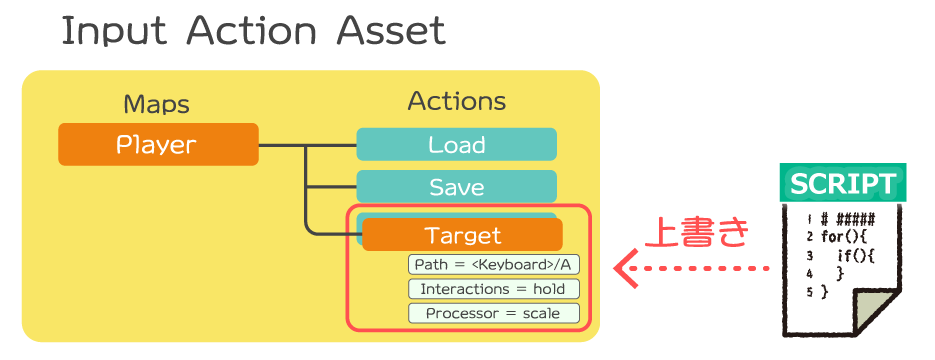
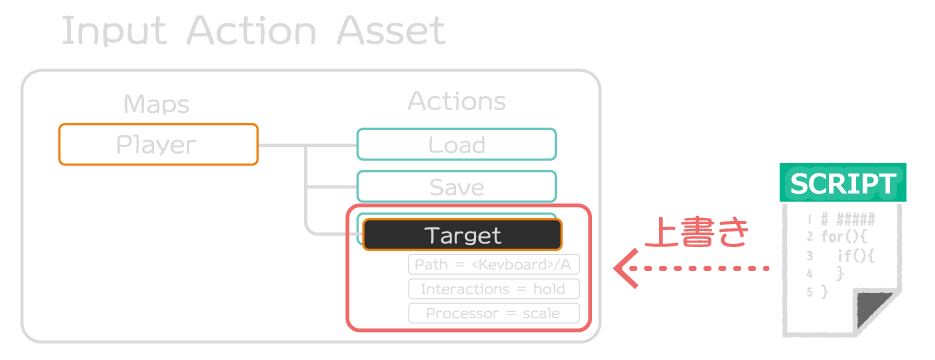
キーコンフィグを実装したい場合は、Actionの上書き機能を使うのが適しています。 これは、下図のように変更とは少し異なる機能です。
上書き機能を使うことで、上書きしたデータのみをJSONとして保存したり、読み込んで適用したりできるようになります。
本記事では、このようなInput Actionの内容をスクリプトから動的に作成・変更する方法を解説します。
- Unity 2022.2.11f1
- Input System 1.5.0
目次 非表示
前提条件
Input Systemパッケージが予めインストールされ、有効化されているものとします。
ここまでの手順がわからない方は、以下記事を参考にセットアップを済ませてください。

また、本記事を読み進めるにあたってはInput SystemのActionの基礎知識が必要です。
基本的な使い方については以下記事で解説しています。

Actionの作成
Input SystemのActionはスクリプトからはInputActionクラスとして扱われます。
参考:Class InputAction| Input System | 1.5.1
InputActionクラスは一つのActionを表すクラスで次のような情報を指定してインスタンス生成できます。
- Action名
- Action Type(Value、Button、Pass Throughなど)
- Bindingのパス
- Interaction(長押し、ダブルタップなど)
- Processor(スケールやデッドゾーンなど)
- 種類の制限(Button、Keyboardのみ受け付けるなど)
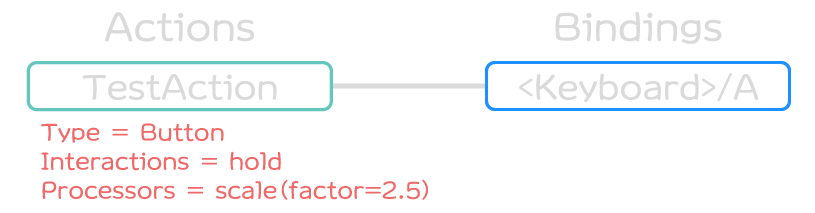
以下はインスタンス生成する最低限のコードの例です。
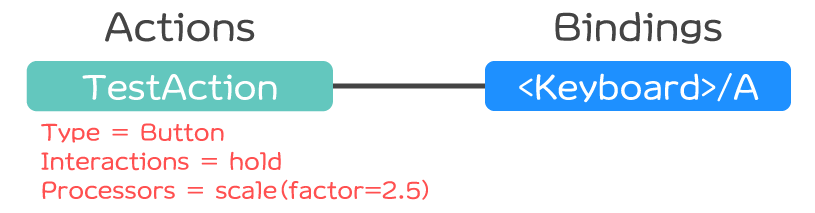
例では「TestAction」という名前のActionを生成しています。キーボードのAキーが押された瞬間に入力が得られます。


ProcessorやInteractionも含めると次のようになります。
InteractionやProcessorなどは文字列として指定します。「名前(引数1=値1,引数2=値2,引数3=値3)」などという文字列形式で指定します。
Processorの文字列指定の形式は以下ページにまとめられています。
参考:Processors | Input System | 1.5.1
Interactionの文字列指定の形式は以下ページから参照できます。
参考:Interactions | Input System | 1.5.1
サンプルスクリプト
スクリプトから動的にActionを生成して、ボタン入力があったらログ出力するサンプルスクリプトです。
上記をCreateInputActionExample.csという名前でUnityプロジェクトに保存し、適当なゲームオブジェクトにアタッチすると機能します。
実行結果
Aキーを長押しすると、入力値がログ出力されるようになります。
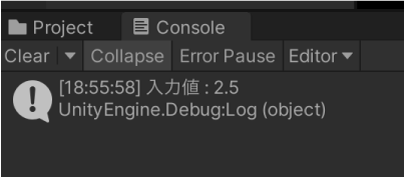
長押しして反応する理由は、Interactionに”hold”が指定されているためです。
また、得られる入力値は2.5になっています。これは、入力値に指定の値を掛けるProcessorのscaleが指定されているためです。
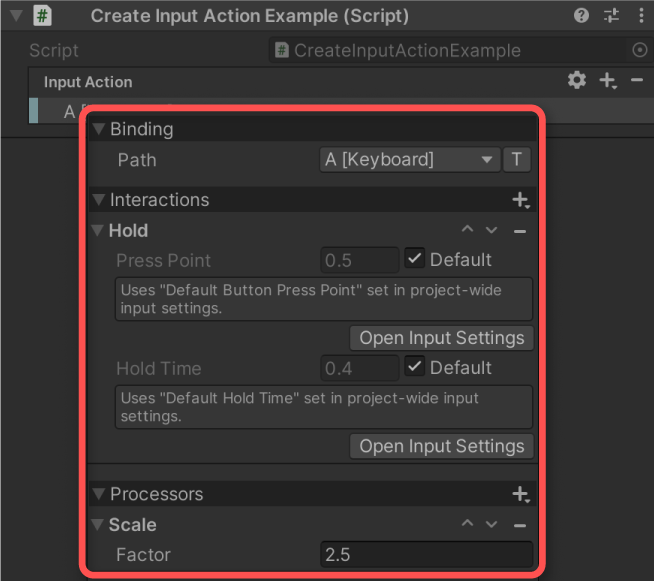
また、上記スクリプトのInput Action項目をダブルクリックすると、指定された内容で初期化されていることが確認できます。
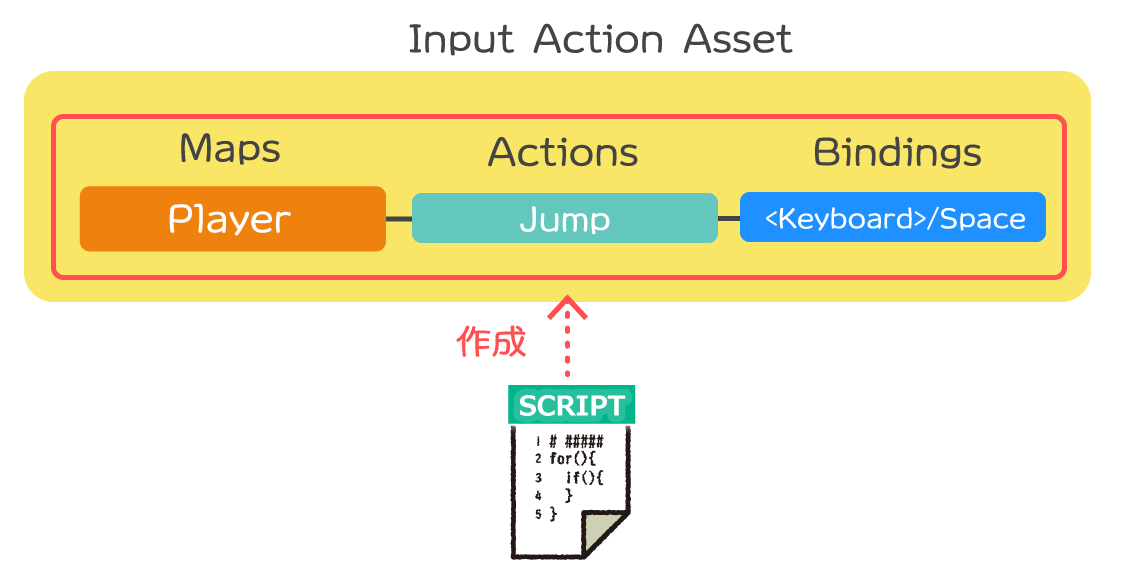
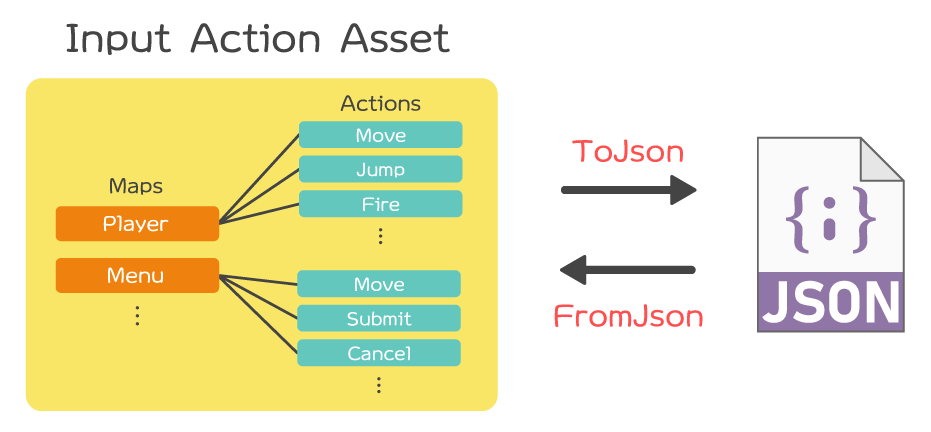
Input Action Assetの作成
Input Actionの定義そのものはInput Action Assetとして保存されます。このアセット自体もスクリプトから作成できます。
Input Action Assetは、下図のように複数のActionをまとめた複数のMapで構成されます。

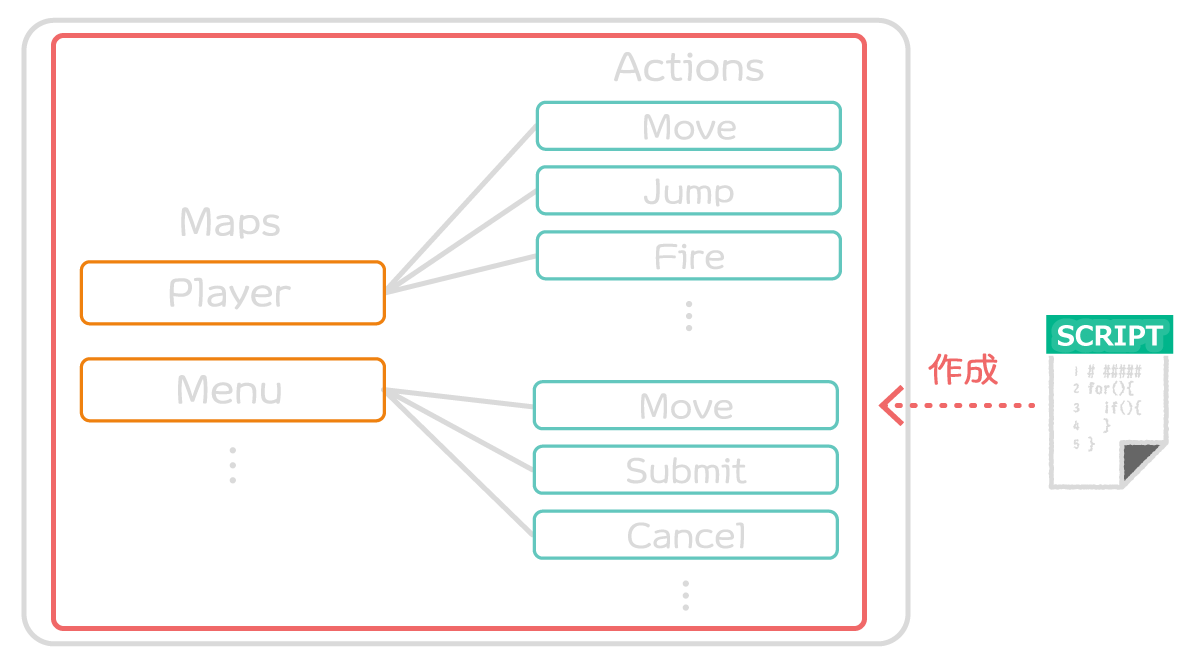
スクリプトからはInputActionAssetクラスとして扱います。
参考:Class InputActionAsset| Input System | 1.5.1
InputActionAssetクラスはScriptableObject継承クラスなので、スクリプトから作成するときは次のようにScriptableObject.CreateInstanceメソッド経由でインスタンス化します。
参考:ScriptableObject-CreateInstance – Unity スクリプトリファレンス
作成したInput Action Assetに対しては、MapやActionを追加したり削除したり編集できます。
サンプルスクリプト
Input Action Assetをスクリプトから作成する例です。
新しくInput Action Assetを作成し、「Player」という名前のMapを作成し、その下に「Jump」というActionを追加しています。
スペースキーが押されるたびに「Jump」というログを出力します。
上記スクリプトをCreateInputActionAssetExample.csという名前でUnityプロジェクトに保存し、適当なゲームオブジェクトにアタッチすると機能するようになります。
実行結果
期待通りの動作になりました。

スクリプトの説明
初期化の次の部分でInput Action Assetを作成してMapとActionを追加しています。
生成されたInputActionAssetインスタンスに対してEnableメソッドを実行すると、Input Action Assetに登録されているAction全体を有効化できます。
参考:Class InputActionAsset| Input System | 1.5.1
Enableメソッドを実行しないとActionが有効化されず、入力を受け取れなくなるためご注意ください。
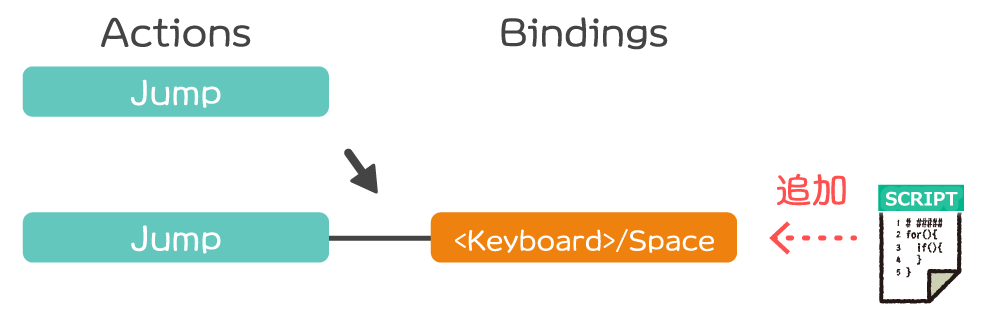
ActionにBindingを追加する
インスタンスとして生成されたInputActionは、後からスクリプトより編集できます。
Actionに後からBindingを追加したり、Composite Binding を追加したりできます。
Bindingの追加
次のようにInputActionインスタンスに対してAddBindingメソッドを呼び出す形で追加できます。
これは、以下のようにいくつかオーバーロードされた拡張メソッドとして定義されています。
InteractionやProcessorなども一緒に追加できます。
戻り値として、Bindingを編集するためのシンタックスが返されます。このシンタックスに対して様々な操作を施すことが可能です。
参考:Class InputActionSetupExtensions| Input System | 1.5.1
参考:Struct InputActionSetupExtensions.BindingSyntax| Input System | 1.5.1
Composite Bindingの追加
ActionにはBindingのほかComposite Bindingも追加できます。次のようにAddCompositeBindingメソッドを呼び出す形で行います。
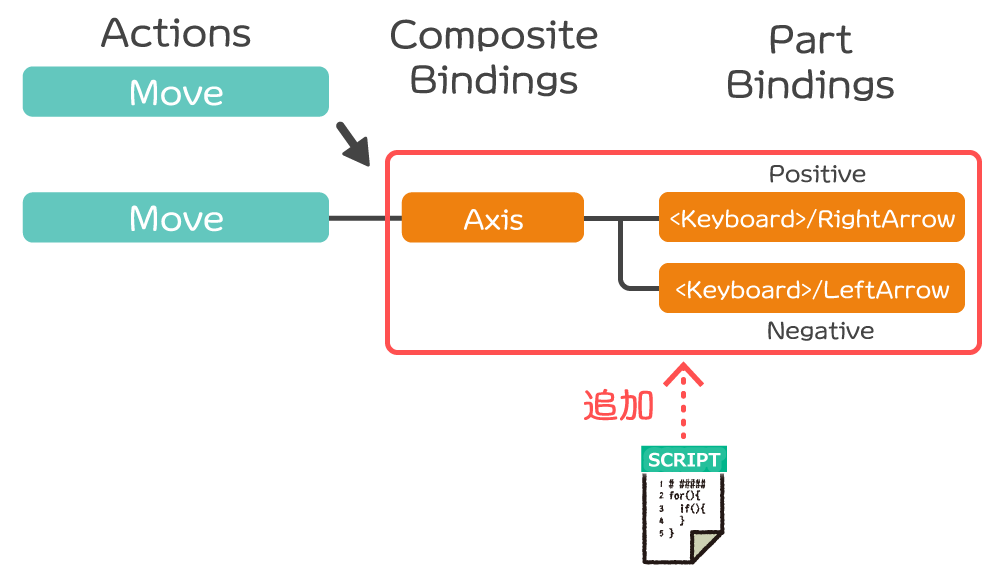
例はAxisというComposite Binding(1軸入力)を追加し、パラメータとして負方向ボタン(Negative)に左矢印キー、正方向ボタン(Positive)に右矢印キーをメソッドチェーンで追加しています。
AddCompositeBindingメソッドは次のような拡張メソッドとして定義されています。
AddBindingメソッド同様、こちらもInteractionやProcessorも同時に指定できます。
戻り値はComposite Binding編集用のシンタックスで、これに対してComposite Bindingのパラメータを設定できます。
参考:Class InputActionSetupExtensions| Input System | 1.5.1
参考:Struct InputActionSetupExtensions.CompositeSyntax| Input System | 1.5.1
サンプルスクリプト
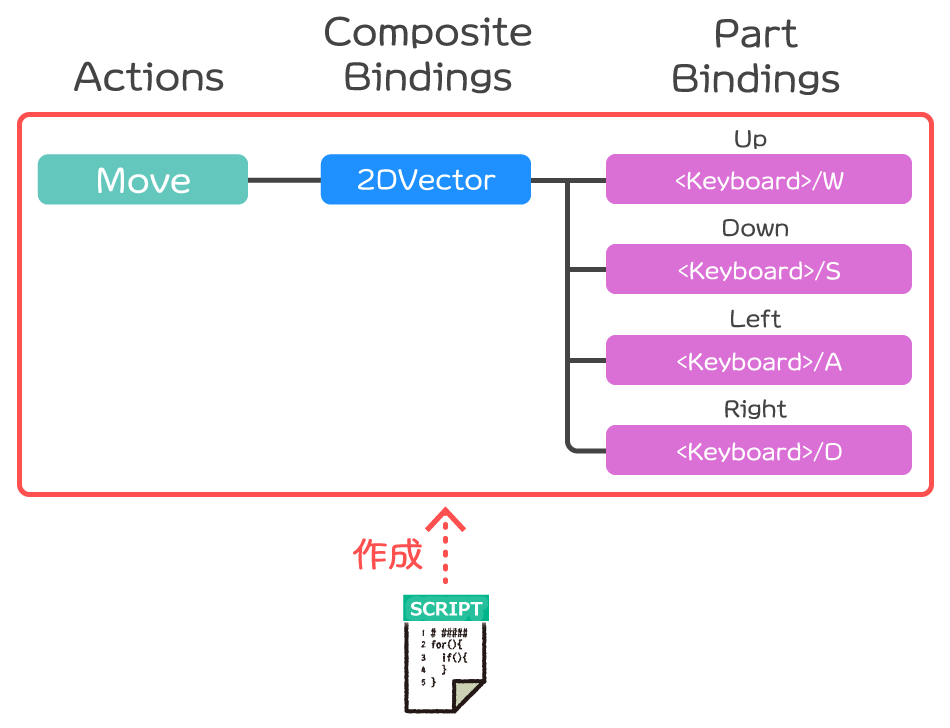
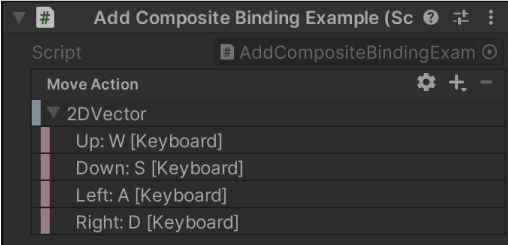
WASDキー入力のComposite Bindingをスクリプトから追加するサンプルスクリプトです。
次のような内容のActionをスクリプトから生成します。
上記スクリプトをAddCompositeBindingExample.csという名前でUnityプロジェクトに保存し、適当なゲームオブジェクトにアタッチすると機能するようになります。
実行結果
WASDキーで2軸入力を取得出来ていることを確認出来ました。
分かりやすさのため、デモでは押されたキーをUIで表示するようにしています。
インスペクター上では2DVectorとしてComposite Bindingが設定されていることが確認できます。
スクリプトの説明
Composite Bindingを追加している処理は以下部分です。
WASDキーなどの4ボタン入力を2軸入力にまとめるComposite Bindingは「2DVector」という名前のため、AddCompositeBindingメソッドの引数に文字列「2DVector」を指定しています。
参考:Input Bindings | Input System | 1.5.1
そして、得られたシンタックスに対してメソッドチェーンで各方向のパラメータに対するControl Pathを指定しています。
これにより、次のコードでVector2型の2軸入力として入力値を受け取れるようになります。
ActionにInteractionやProcessorを追加したい場合
Input Systemでは、ActionやBindingに対してInteractionやProcessorを設定できます。
ただし、Action自体 に対して後からInteractionやProcessorを追加する手段はInput System 1.5.0時点では提供されていません。
Actionに追加されている個別のBindingに対しては、後述の手順により後からInteractionやProcessorを追加可能です。
ActionのBindingを編集する
予め作成したActionのBinding対して、後からControl Pathを変更したり、InteractionやProcessorを追加したりできます。
- Nameを指定する
- Control Pathを指定する
- Interactionを追加する
- Processorを追加する
InteractionとProcessorについては追加しかできない点にご注意ください。
名前を編集する
Actionに登録される各Bindingには、名前を設定することが可能です。
これは、後述するBindingの編集の際、ActionからBindingを検索して取得する際に使用できます。
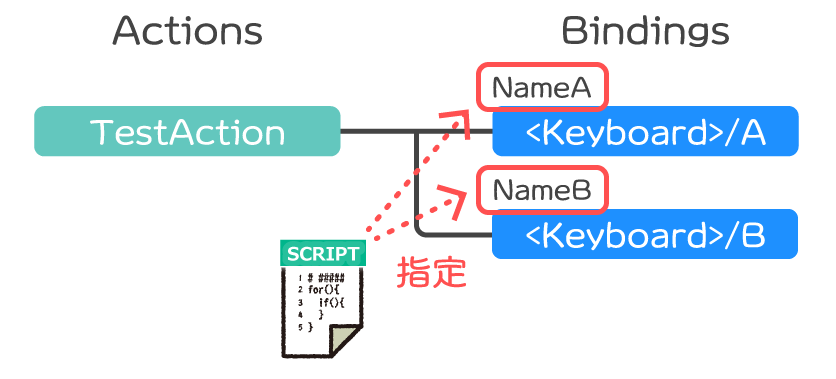
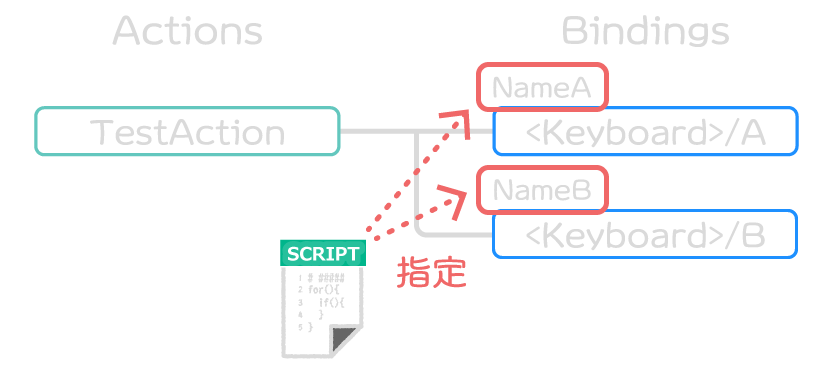
次のようにAddBindingメソッドなどに対してメソッドチェーンで指定できます。
参考:Struct InputActionSetupExtensions.BindingSyntax| Input System | 1.5.1
Control Path、Interaction、Processorを編集する
例えば、AまたはBキーが押されたらperformedが発火する「Jump」というActionに対して、次のような変更を加えることを考えます。
- BキーをCキーに変更する(Control Pathの変更)
- 長押しでperformed発火とする(Hold Interactionの追加)
- 入力値を3倍にする(Scale Processorの追加)
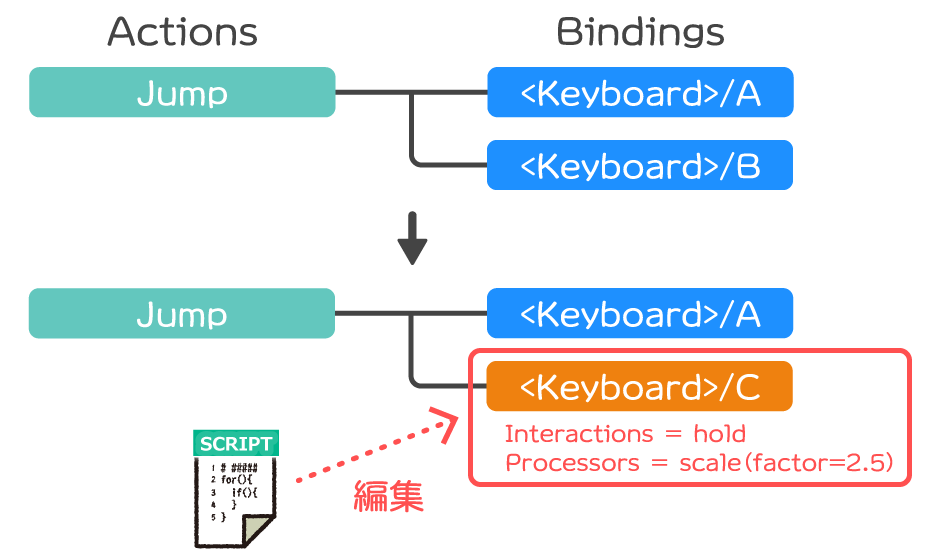
これをコードにすると次のようになります。
Actionに登録されているBindingにアクセスするためには、ChangeBinding拡張メソッドを使用します。
引数には、Bindingに対する0始まりのインデックスを指定します。
戻り値は、Binding編集用のシンタックスです。
参考:Class InputActionSetupExtensions| Input System | 1.5.1
なお、ChangeBindingには名前指定で取得するオーバーロードされたメソッドなども用意されています。
状況に応じて使い分けると良いでしょう。
必要な方は上記公式リファレンスをご確認ください。
サンプルスクリプト
以下、予め生成されたActionに対してControl Pathを変更し、InteractionとProcessorを追加する例です。
最初にA、BキーのBindingを追加し、後からBキーのBindingだけ編集しています。
上記スクリプトをChangeBindingExample.csという名前で保存し、適当なゲームオブジェクトにアタッチすると機能します。
実行結果
BキーのBindingがCキーに変更され、長押ししないと反応しないようになりました。また、入力値が2.5倍されています。
Bindingを削除する
予め追加されたBindingを削除したい場合も、ChangeBindingメソッドなどで得られるシンタックスを使います。
Binding削除にはシンタックスのEraseメソッドを使います。
参考:Struct InputActionSetupExtensions.BindingSyntax| Input System | 1.5.1
Input Action Assetのセーブ・ロード
スクリプトなどで編集したInput Action Assetの内容はJSONにシリアライズしたり、逆にJSONからデシリアライズできます。
これにより、Input Action Assetをファイルなどから読み書き可能になります。
JSONへのシリアライズ(JSONへの変換)にはInputActionAsset.ToJsonメソッドを使います。
参考:Class InputActionAsset| Input System | 1.5.1
JSONからのデシリアライズ(JSONからの読み込み)メソッドは、InputActionAsset.FromJson、InputActionAsset.LoadFromJsonメソッドの2種類があります。
InputActionAsset.FromJsonメソッドはJSONから新しいInputActionAssetインスタンスを生成します。
InputActionAsset.LoadFromJsonメソッドは既存のInputActionAssetインスタンスを使いまわして内容をロードします。
参考:Class InputActionAsset| Input System | 1.5.1

JsonUtilityクラスを使用したJSONのシリアライズ・デシリアライズでは正しく動作しませんのでご注意ください。
サンプルスクリプト
Input Action AssetをJSONとして読み書きするサンプルです。
Aキーが押されたら保存、Bキーが押されたらロードする処理になっています。
保存場所はインスペクターから参照できる変数に格納するようにしているため、ロード前にここを編集するとキーアサインを自由に変更できます。
実行結果
Aキーを押すと、インスペクターのJson項目にシリアライズされたJSONが出力されるようになります。
この時、Jsonの内容を編集してからBキーを押すとインスペクターで編集されたJSONが読み込まれて適用されます。
上記動画では、保存のAキーをCキーに変更してからロードさせる挙動を実演しています。
スクリプトの説明
保存キーが押されたときは、以下処理でJSONにシリアライズしています。
ロードキーが押されたときに、JSONからデシリアライズして読み込む処理は以下部分です。
インスタンス破棄前にコールバックの登録を解除し、その後にLoadFromJsonメソッドでJSONからのロードを行っています。
この後、各種コールバックの再登録を行います。
ロード後はそのままではActionが無効化されてキー入力を受け取れない状態のため、以下で有効化する必要があります。
Input Action Assetの実態
Unityプロジェクト等で保存されているInput Action Asset(拡張子が.inputactionsのファイル)も中身はJSONとして管理されています。
InputActionAsset.ToJsonメソッドが出力するJSONと同じ構造です。
Actionの一部を上書きする
ここまでInput ActionやInput Action Assetに対してスクリプトから編集する方法を解説してきました。
しかしながら、キーコンフィグやマウス感度調整などの機能を実装する場合は「上書き」を使って内容を編集する方法が適しています。
理由は次のような特徴を備えているためです。
- 既存のAction内容とは別に「上書き」情報として管理される
- 上書き内容をセーブ・ロードする専用メソッドが存在する
これらの操作用メソッドは、InputActionRebindingExtensionsクラスのメソッド群として提供されています。
参考:Class InputActionRebindingExtensions| Input System | 1.5.1
Bindingの上書き
指定されたActionのControl PathやInteraction、Processorなどを上書きしたい場合、次のようなにInputActionに対してApplyBindingOverrideメソッドを実行します。
InputBindingインスタンス指定で上書き内容を指定する場合は、次のフィールドに内容を格納することに注意してください。
- Control Path – overridePath(pathではない)
- Interaction – overrideInteractions(interactionsではない)
- Processor – overrideProcessors(processorsではない)
参考:Class InputActionRebindingExtensions| Input System | 1.5.1
サンプルスクリプト
以下、指定された名前のActionを上書きするサンプルです。
上記を使いたい場合は、OverrideExample.csという名前でUnityプロジェクトに保存し、適当なゲームオブジェクトにアタッチし、インスペクターより必要項目を設定してください。
Input Action Asset項目にUnityプロジェクトで管理されているアセットへの参照、Target Nameに上書き操作したいAction名を設定します。
例では以下のようなInput Action AssetとAction名を設定することとします。
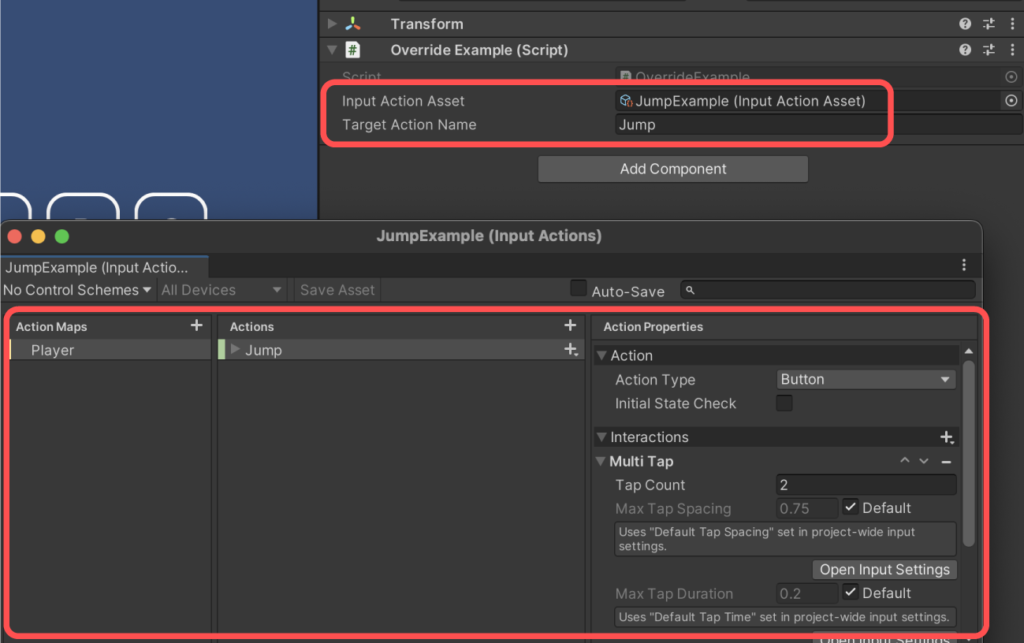
検証のため、Input Action Assetの該当Actionには、Interactionにはダブルタップを表すMulti Tap Interactionを追加しています。
実行結果
Control PathがBキーに変更され、長押しInteractionが追加されていることが確認できました。また、Scale Processorの追加により入力値が3倍されています。
上書き前ではMulti Tap Interactionが追加されていましたが、こちらも機能しています。なお、上書き前のControl Pathは反応しなくなっています。
スクリプトの説明
これまでの例ではスクリプトからInput Action Assetインスタンスを生成するコードを示していましたが、今回はインスペクターから予め指定する方法を取っています。
Actionに対する上書き処理は、以下部分で行っています。
Control Pathを変更し、InteractionとProcessorを追加しています。既存のものは削除されません。
上書き内容のセーブ・ロード
上書きしたBindingの内容をキーコンフィグなどとしてセーブ・ロードできるようにしたい場合は、専用のメソッドを使います。
こちらは、上書き内容のみをJSONとしてシリアライズ・デシリアライズする機能です。
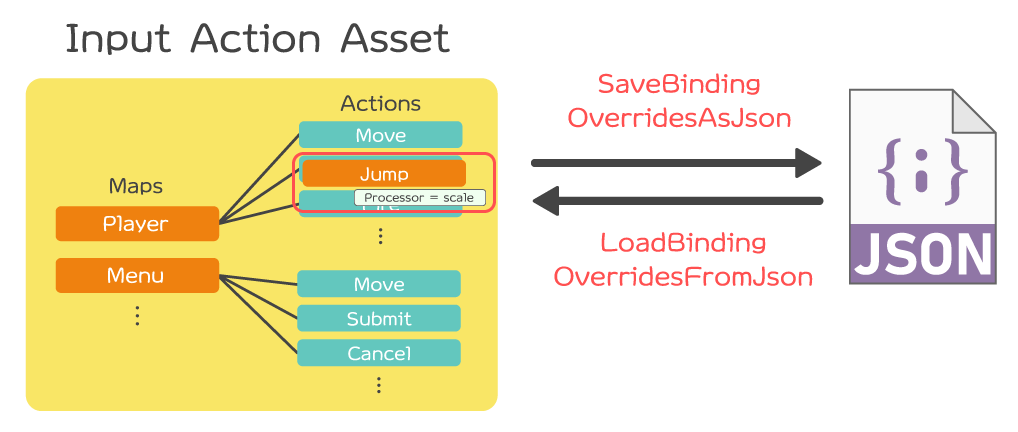
上書き内容をJSONとして取得するにはSaveBindingOverridesAsJson拡張メソッドを使用します。
参考:Class InputActionRebindingExtensions| Input System | 1.5.1
逆に上書き情報のJSONをActionに反映したい場合は、LoadBindingOverridesFromJson拡張メソッドを使います。
サンプルスクリプト
指定されたActionの上書き内容を読み書きするサンプルです。
「Target」という名前のActionに対して内容の上書きを行います。
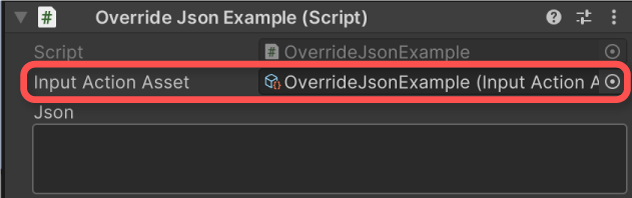
上記をOverrideJsonExample.csという名前でUnityプロジェクトに保存し、適当なゲームオブジェクトにアタッチした後、次のような名前を含むActionを定義したInput Action Assetを作成します。
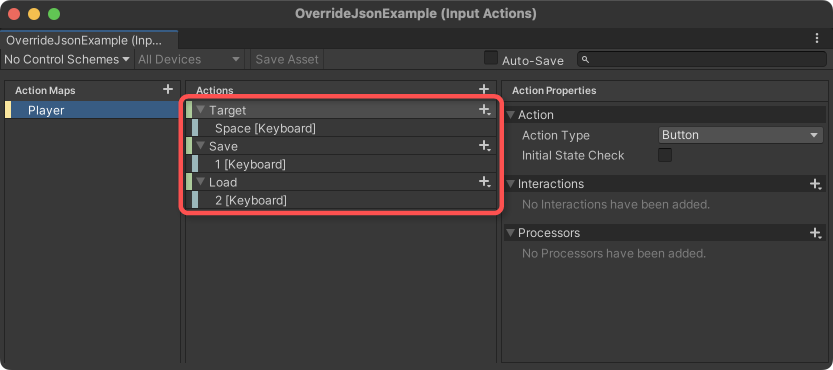
その後、インスペクターより上記Input Action Assetをセットすると機能するようになります。
上記の通りの設定にしないとサンプルは正しく動作しませんのでご注意ください。
実行結果
対象のAction(名前がTarget)がAキーの長押しで反応するように設定が上書きされています。
その後、上書き内容をJSONとして保存し、上書き対象のActionキーをBに書き換えた後ロードさせています。
そのため、ロード後はBキー長押しで反応するようになっています。
スクリプトの説明
まず、デモを実行するのに必要なActionを名前で検索して取得しています。
検索に失敗したらnullが変えるので、その場合は続行不可として処理を中断しています。
以下処理で名前がTargetのActionに対して上書きを行っています。
Control PathをAキーに上書きし、Interactionを長押しに、Processorで入力値を3倍にする効果を付加しています。
保存キー(例では1キー)が押されたとき、以下処理でフィールドにJSONとして上書き内容を保存しています。
ロードキー(例では2キー)が押されたとき、保存された上書き内容をロードする処理は以下部分です。
Input Action自体のロードとは異なり、こちらは改めてActionを有効化する必要がありません。
参考:Class InputActionRebindingExtensions| Input System | 1.5.1
Input Action Asset自体のセーブ・ロードを実行したときの挙動
InputActionAssetインスタンスに対してToJsonメソッドで内容をシリアライズしたとき、上書き内容は無視されます。
検証用スクリプト
以下、Input Action AssetのActionに対して上書きした後、Input Action Assetと上書き内容をそれぞれJSONとして保存するスクリプトです。
例ではJumpというActionをAキーで反応するように定義し、その後Bキーに上書きしています。
実行結果
ToJsonメソッドでシリアライズされたJSONでは、上書き前のAキーが出力されています。
一方、SaveBindingOverridesAsJsonメソッドでシリアライズされた上書き内容のJSONでは、Bキーが出力されています。

それぞれの内容が排他的に出力されていることが確認できます。
さいごに
Input Actionにはスクリプトから内容を変更するメソッドが公開されています。しかし、InteractionやProcessorの変更など一部制限がある操作もあります。
また、キーコンフィグなどの実装では上書き機能を用いると実装がスムーズです。
本記事では原理の解説に絞るため、キーコンフィグの具体的な実装方法は割愛させていただきました。これは別記事で改めて投稿させていただきます。

